As I’ve mentioned once or twice, I seem to be a glutton for punishment. With the front doors done the difference between the front and rear doors was obvious.
I actually had all of the trim pieces for the rear doors. They were in the trunk of the car when I bought it. After doing the front doors I knew how all of these pieces fit. And how to do a better job of fitting the arm rest.
Sigh.Fine. Pull the rear door cards off the doors. Dig out the aluminum trim panels and chrome trim. Start the process from the middle.
First, cover the aluminum trim panel with vinyl and then fit it and secure it in place.
Fit the arm rest and start adding bolts and sheet metal screws to hold it in place. The bottom of the arm rest was warped, especially on the driver’s side. Screwing it to the door card flattened it out nicely.
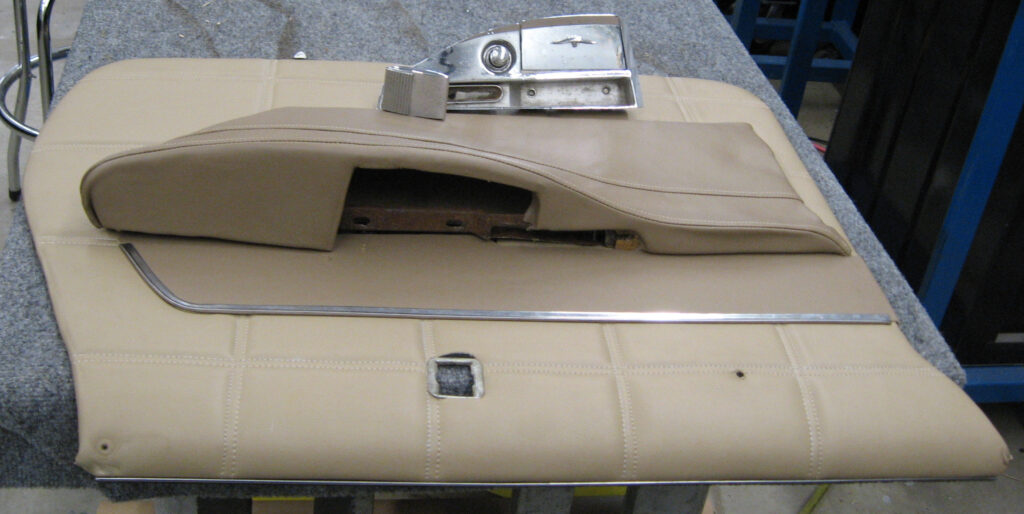
Rear door card with insert added. Arm rest is now secured to door card.
Install the updated door cards back on the car, test everything, and rejoice.
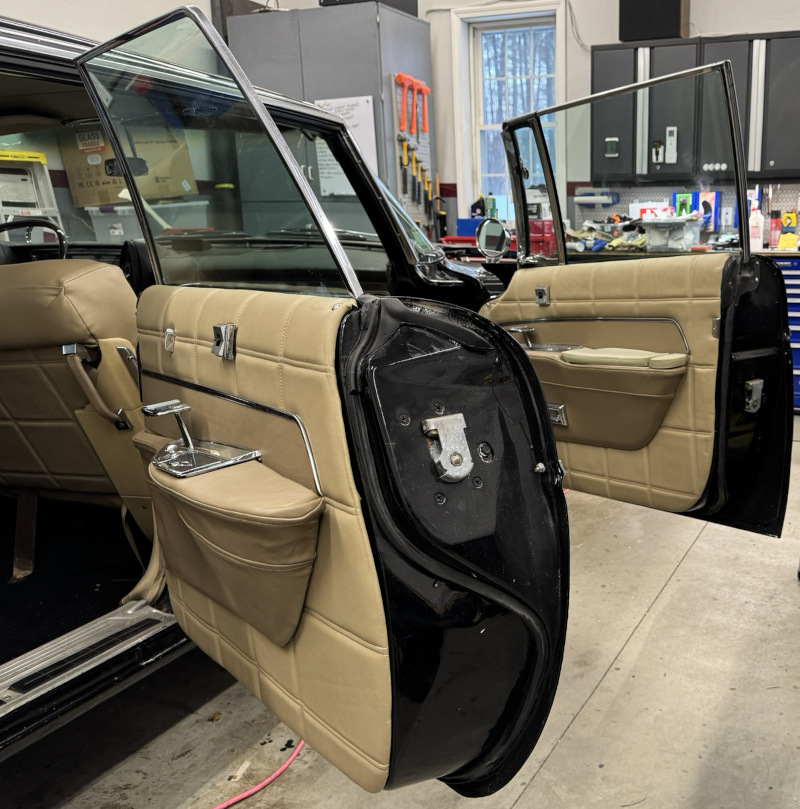
Matching front and rear doors
Of course it wasn’t quite as simple as this description might imply… But it did go fairly smoothly and the results were good.
In yet another demonstration of a lack of common sense I decided it was time to tackle the front door cards.
Unlike the replacement hardboard panels on the rear doors, the front doors still had the factory door cards. These were made from a cardboard like compressed paper material. Which was fragile when new. It doesn’t age well. If exposed to water it basically falls apart. I’ve been afraid to touch it…
But the job has to be done. Sometime. Sigh, it looks like sometime is now….
Pop the first door card off and plop it on the workbench. Carefully take the arm rest off. The Imperial has a trim piece directly above the arm rest – an aluminum sheet with a sort of floral pattern and a chrome plated metal surround. This was also carefully removed.
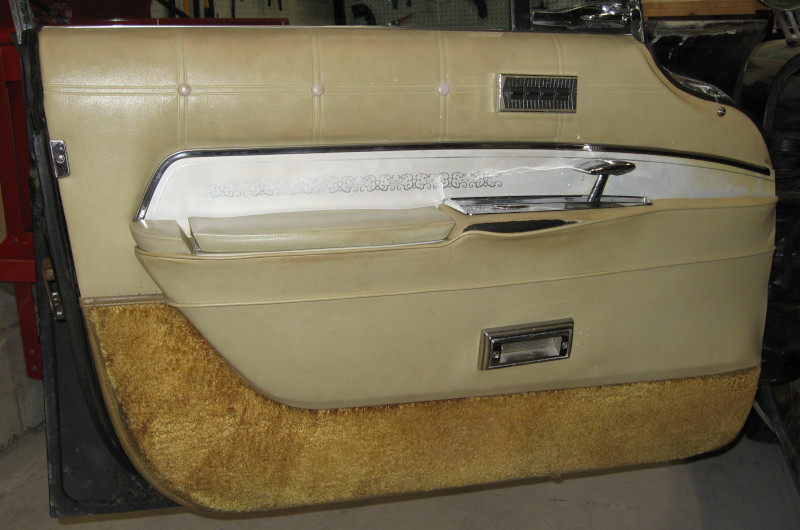
Original front door card
The first view of what we have to work with is a bit of a mixed bag:
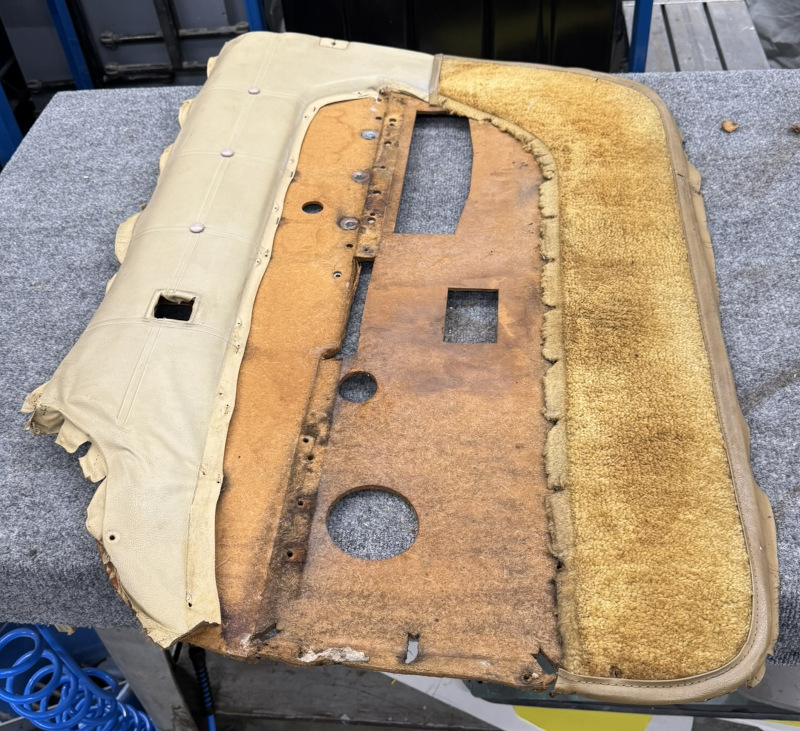
Front Door Card, arm rest and trim panel removed.
The first thing you can see is the (f)ugly carpet along the bottom of the door. This absolutely has to go. What was Chrysler thinking???
The second is that the door card is molded – you can see how the trim panel is partially recessed. This means that you will have trouble fitting things back together if you replace the factory panel with a flat piece of hardboard. This explains some of the challenges I had with the rear door cards. OK, I really need to save the factory pieces.
Time to carefully peal the old vinyl and carpet off. A heat gun softens the old adhesive and minimizes damage.
Front Door Card stripped
I’ve seen worse… It is actually in reasonably good shape except for the holes around the edges for the mounting clips. If I’m careful installing it should be OK.
The initial steps are like the rear door cards: cut and fit 1/4″ SewFoam to go over the whole panel. Double stitch the foam to the vinyl in 6″ squares – making sure that they line up with the stitching on the back doors. Spray the door card and cover with spray adhesive, fit the cover to the door, and staple on the back. The fit around the molded indents wasn’t great – but the arm rest and trim panel would pull everything into place.
The first major difference is the aluminum trim panel. These were worn and dirty. And ugly from the factory. Again, what was Chrysler thinking? I considered covering them with a nice walnut veneer. This would look rich – it was what Chrysler should have done in the first place.
I ultimately decided to just use some of the darker vinyl – I was already using it other places for accent. A round of spray adhesive, some fitting and trimming, and the updated trim panels were ready to go.
On the rear door cards the mounting of the arm rest and trim panels was a mystery. On the front doors taking them apart showed all of the mounting hardware and tricks.
First was to position the aluminum trim panel and the chrome trim. The chrome trim had a series of “nails” sticking out the back when went through holes in the door card and were then bent over. The arm rest used a combination of nuts and bolts, sheet metal screws, and the “nails”.
There was a bit of fiddling to deal with the thicker foam backed vinyl, but everything eventually went together. The last step on the workbench was to carefully install the retaining clips around the edge.
Time to cross my fingers, cart the refurbished door card over to the car, and attempt to install it. After a few gyrations the door card clipped into place. Install the courtesy light into the door and verify that it works. So far, so good. The last step was to install the power window switch and see if the window still goes up and down.
The window goes up. The window goes back down. The window goes up again. The door closes. The door opens. The door closes again. And there was much rejoicing!
Spend a few minutes admiring my work. Then on to the remaining door.
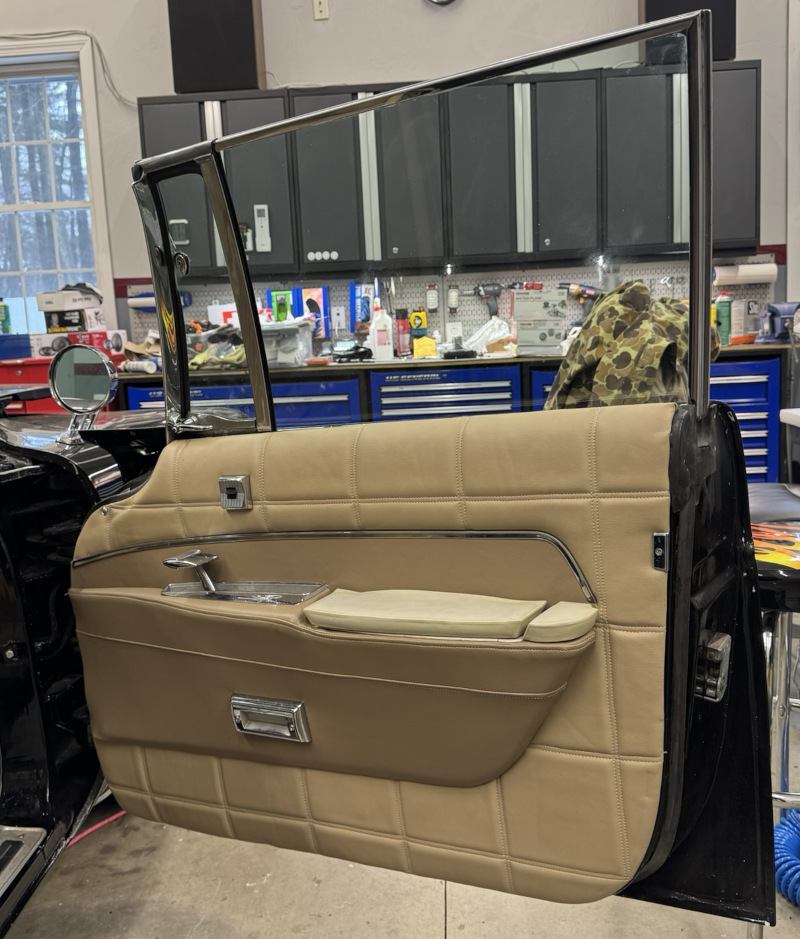
Front Door Card finished
I’m rather happy with how this turned out! The old fiberboard held up better than I expected. The trim panel above the arm rest adds a nice bit of contrast. Walnut would have been nicer, but this is fine. This task went better than I expected going into it – always good when that happens! I’m beginning to look forward to cruise nights this summer.
With a conceptual design for a Wizard Staff in hand the next step was to prepare a budget proposal for a 3D printer and submit it to my CFO. Or, to put it differently, tell She Who Must Be Obeyed that I need a Bambu X1C 3D printer for my projects. The response was “how much is it and will it do what you need?” Answer: “yes, it does what I need. And it is on sale right now.” Her response: “OK. Order it before the price goes up.” What did I ever do to deserve this lady?
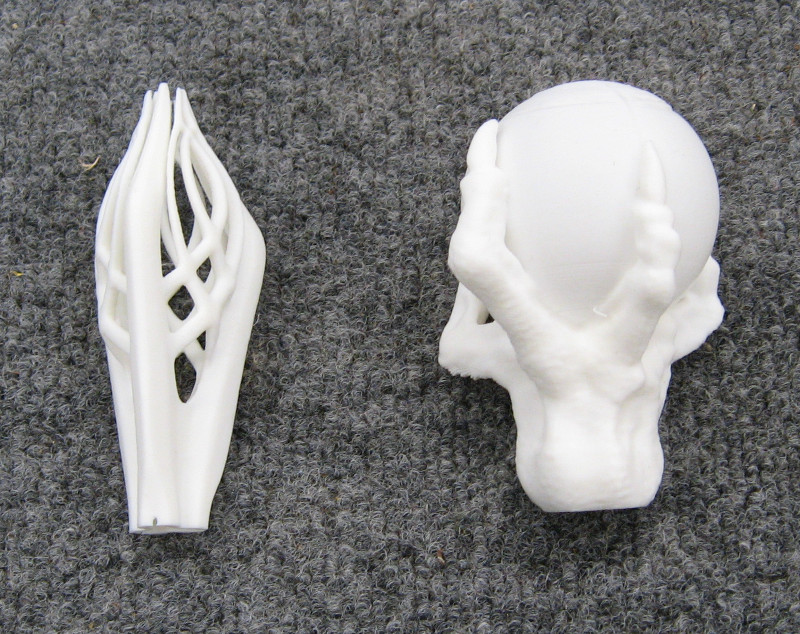
As I may have previously mentioned I am an engineer and I am artistically declined. So I started searching for 3D models. Wanted something better than a ball glued to the end of a stick. Couldn’t find a good cobra head but I did find a dragon paw and a Gandalf staff from Lord of the Rings. Grab both models and print small versions of them – small versions to minimize the amount of printer filament used.
Small 3D prints of potential staff heads.
The Gandalf staff has a kind of basket to hold the orb. The description recommends starting the print, stopping it half way through, inserting an orb, and then finishing the print. This works but makes it difficult to change or work on the orb.
The dragon paw is available with or without the orb. You can print it without the orb and insert the orb later. And there is a design for the orb that splits the orb into two halves with a separate structure that holds the two halves together and provides support for LEDs.
I rather like the way the dragon paw looks. And I can definitely design a sphere! So let’s start off by building a prototype based on the dragon paw and an orb that contains programmable LED strips.
As a side note there are a huge number of 3D models that people share. These can be printed directly or modified. The dragon paw model I’m starting with is the Orb in Dragon Claw model posted on Thingiverse by Argasman. This model is licensed under the Creative Commons – Attribution license, which means that I’m free to use the model as long as I give credit to Argasman.
My old engineering manager from the days when I was designing jet fighters had a standard response to any idea or suggestion: “show me the drawing”. His position was that you did not actually have anything worth discussing until you could show at least a sketch.
And he was right. Words and word pictures are just the beginning of an engineering design. They are, at best, the parameters of a design. Until you have a drawing – at least a sketch – you don’t have anything real.
Creating a drawing makes you think things through. The initial sketch isn’t a finished design. Engineering design is an iterative process. It starts with a rough concept that goes through multiple stages of changes. Hopefully these changes are improvements and refinements.
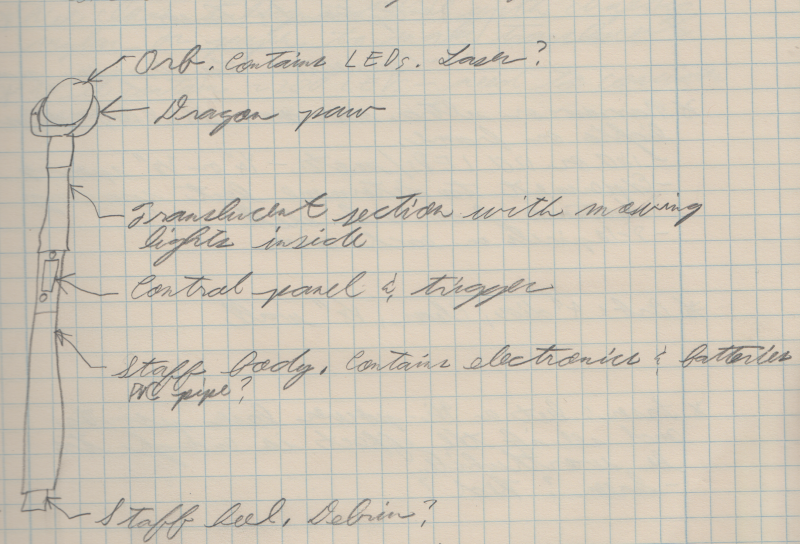
Conceptual design for wizard staff
The goal of an initial design, often called a conceptual design, is to quickly explore multiple alternatives, to identify major subsystems, and to allow you to begin the process of breaking an overall design down into individual pieces that can be worked on.
You usually build prototypes of your design. This is important in the early design phases to make sure that your ideas actually work. It is also important later in the design to make sure that all of the pieces actually fit together.
The most critical part of the Wizard Staff is the orb. If we can build a good orb and attach it to the staff the project will be successful.
We’ve got our starting point: build a prototype of the orb and how it will be attached to the staff. There are several sub-goals for this prototype:
Make something that looks good. The staff must both look good and work well.
Make something that works. Whatever we come up with will ultimately be stuck on the end of a stick, waved around, and abused. It must be strong enough to survive routine handling.
Prove the core technology. Use LED strip lights to create a dynamic light show inside the orb and possibly inside the body of the staff. If we can’t build something exciting there is no point going any further.
Build a structure that will support the LED strips inside the orb and let us work on them. This is important while building the orb and for later maintenance and improvements.
Conceptualizing a Wizard’s Staff, the first element is an orb – a ball or crystal, probably 4″-6″ across. These commonly glow when getting ready to cast a spell and then go dark again after the spell has been cast.
This is how most Wizard’s Staffs are built – some LEDs inside a ball that can be turned on and off.
We can do better than that! A 4″ or larger ball has plenty of space to hold LED strip lights. Using LED strip lights we can achieve a wide range of effects: glowing, different levels of brightness, changing colors. We can even implement patterns, effects, and shows – think MegaTree in a ball! We can build “magic spells” that power up and have special effects when “cast”. Hmm, if we are going to do that we really need to add sound effects… This goes beyond any of the examples I’ve been able to find online.
With an idea of how to build an orb, the next question is how to hold it. Possibilities include just attaching it to the end of the staff, a shepards crook, a basket of some sort, a cobra head, or a dragon paw.
Which leaves the tiny little question of how to actually build it. Just a minute – this is the sort of thing that 3D printers are made for! I’ve wanted a 3D printer for years, but kept putting off getting one because I didn’t have a project that would use it. I know myself well enough to know that I need something to utilize a new tool immediately; otherwise it will just sit around gathering dust.
A 3D printer backed by a machine shop combined with MegaTree lighting technology driven by my warped little mind and aided by a (equally warped) electrical engineer should be able to pull this off! This is where you channel Dr. Frankenstein from Young Frankenstein:IT! COULD! WORK!
If we are going this far, what else can be included?
If an Arduino controller is going to be used we can have multiple interactive and dynamic “spells”. This means that we need to design at least 3 “spells” and have a user interface for selecting spells as well as casting them.
If we are going to power up and cast spells with the orb, what about having clear sections of the staff itself that have lighting effects – power running up the staff and into the orb? I haven’t seen that done before and it could be quite interesting.
Sound is clearly a requirement. So controllers and speakers must be integrated into the design.
Can we build a laser into the staff? What about throwing fireballs?
This is looking like it is going to need a lot of power. Definitely more than a couple of AA batteries can handle. The body of the staff should have enough volume for the needed batteries but we are going to have to design a real power subsystem.
This is going to be a true design and build project. One with artistic, engineering, construction, hardware and software elements. Will the results be magic or a let down? I dunno; going to have to build it to find out!
My newest project really needs an introduction and some background. You have been warned!
As the MegaTree neared completion I was thinking about other things that could be be done with this computer controlled lighting technology. Leading to a conversation with a friend and fellow engineer – and potential co-conspirator. He happens to be an Electrical Engineer with extensive experience designing and building micro-controller base systems, both hardware and software. He is also fairly serious about Halloween.
We began discussing how to build a Harry Potter Dementor: Flowing, filmy fabric illuminated with ultraviolet LEDs to make a glowing, moving phantasm. Hmm, it would be much more interesting if it could actually move. What about building a Dementor on a stick mounted on a remote controlled wheeled platform? We could build in a variety of effects and have it chase people!
There are drawbacks to a Dementor on a stick: it would have limited mobility. It would be top heavy and tend to fall over. And it wouldn’t be that realistic.
Building on the challenge of how to move a Dementor we considered the Dementor itself: largely a gauzy, filmy body with some structure. This could be very light. Hey, what about a Drone Dementor? Hang a fabric body from a drone. Use UV sensitive fabric and mount LEDs on the drone. This would be a true flying Dementor that could be as scary as we wanted!
She Who Must Be Obeyed weighed in: “No”. Oh well, a drone with enough carrying capacity for a Dementor would be a bit expensive anyway.
OK, back to the drawing board. We were past Halloween anyway, so this project wasn’t needed until next year.
What else would be good for Halloween? Well, skeletons are popular. Just a minute – what about getting one of the dog skeletons and making a robot dog! Making it walk would be a lot of work, but putting it on a remote controlled wheeled platform would be fairly straightforward and would be fairly realistic at first glance. Especially in the dark coming out from the bushes. Unlike a Dementor, dogs travel on the ground so stability wouldn’t be a major problem. Size and weight of motors, controllers, effects, and batteries wouldn’t be an issue.
Making the jaws move should be easy. We could probably articulate the neck, at least enough to raise the head for howling. My co-conspirator wanted the dog to sit. I roughed out a concept for a framework to support the skeleton that had joints for sitting. Sound effects would be required – at a minimum barking, howling, and growling.
Of course glowing red eyes are a given!
At this point She Who Must Be Obeyed provided further guidance: “NO. You will not traumatize small children. You will not chase Trick or Treaters. No scary robot dogs.” Some people just don’t know how to have fun…
What else could be done? Ponder, ponder, ponder…
Keeping to the theme of building something supernatural that uses technology to build magical effects – what about magic itself? What about something to cast magical spells? A magic wand is too small to build much into, but what about a Wizard’s Staff? One with a glowing orb? And potentially other accessories.
This could be an interesting build. And it was approved by She Who Must Be Obeyed.
Hopefully this will be the last post on the courtesy light electrical gremlins. It looks like there were two independent – and intermittent! – problems: prongs in the light socket touching the shell and a door switch not long enough to function reliably.
In the last post I described insulating the light socket to prevent potential shorting. A shim on the door provided a temporary fix to the door switch problem.
For a permanent fix I ordered a pair of door switches from Rock Auto. When installing them I replaced the bullet connector on the end of the wire just to be sure. And… The door wouldn’t close. The new door switches were too long. Crud!
When I had described the problem on Garage Journal several people had claimed that door switches were adjustable – the shaft could be extended. The Rock Auto switches weren’t adjustable – but the original factory switches were!
Of course the adjustment on the factory switches was frozen. Nothing that a vise, various tools, and strong language couldn’t overcome! With the shaft extended to what looked like a reasonable length there was nothing left but to screw it in place, hook it up, cross my fingers, and close the door.
Success! The switch now works reliably when opening and closing the door!
With two independent problems fixed I hope this problem is fixed for good! Time will tell…
As mentioned in a previous post I am (finally) re-doing the front door cards. Since this exposes the guts of the door it’s the obvious time to check out the wiring.
There is quite a bit of wiring in the front doors – power windows, power window switch (and connection to the master power window switch in the drivers door), and the infamous courtesy light. Plus the new power and ground wires I added to drive the electric windows reliably.
The wiring harness looked good. It always looks good. If it doesn’t look good I replace it! But there was something strange in the wiring to the power window switch… The wires weren’t exactly what was called out in the Factory Service Manual. Time to remove the tape protecting the harness and see what was going on.
Under the tape was a folded piece of wire not connected to anything else. Just sitting there. Strange! No idea what that was all about. With that wire out of the way the rest of it made more sense.
Anticipating working on the wiring harness inside the door I finally broke down and bought the right tool for the job – Tessa Tape. This tape is made specifically for wrapping wiring harnesses. It is made of cloth to be abrasion resistant. It has a special adhesive that sticks to the tape but not much else – unlike regular electrical tape which leaves sticky adhesive residue all over everything. Tessa Tape is a complement to electrical tape – electrical tape insulates and Tessa Tape is for wrapping wire bundles.
Using the Tessa Tape I re-wrapped the wire bundles I had opened up. I also wrapped the wiring harness where it entered the door to provide additional abrasion resistance and protection for the wires.
While it was on the workbench I took a close look at the socket for the courtesy light. Hmm, it looks like the spring loaded prongs that make electrical contact with the bulb are close to the shell. Wait a minute – what if one of the contacts has worn just enough that it can sometimes make contact with the shell of the socket?
There was the time that touching the socket to the door frame would cause the light to come on. I blamed the LED bulb I was using for the problem – replacing the LED with a regular bulb caused the problem to go away (at that time…). What if the problem wasn’t the LED but instead one of the contacts?
This is simple enough to fix – insulate the shell from any possible way of touching the contacts. A strip of plastic inside the socket would do the trick. I had some mylar drafting film that was perfect for this. Cut a strip just wide enough to barely touch the base of the bulb when the bulb is installed and slip it inside the socket.
I’ve been suspicious for quite a while that there were actually multiple issues with the courtesy lights and that I was seeing different issues at different times. The combination of problems with the door switch and the light socket would seem to cover just about everything I’ve seen. Hopefully the problem is finally fixed!
In a previous post on Chasing Gremlins I documented problems with the courtesy lights coming on when they weren’t supposed to. I fixed this problem. Several times. In September it came back. The courtesy lights are coming on and staying on.
Thoroughly frustrated I parked the car, disconnected the battery, threw the car cover over it, and moved on to other projects.
Last week I decided it was time to tackle this problem again. Pull the car cover off and reconnect the battery. Yup, the courtesy lights are on.
The first step was to spend a couple of hours spelunking through the wiring diagrams in the Factory Service Manual. With a somewhat better understanding of how things are connected dive into the car.
Starting with a brute force approach I pulled the fuse for the dome light. Which also powered the tail lights, rear turn signals, and brake lights. The tail lights went out and the courtesy lights remained on. Not what I expected.
Pulling the main fuses that power all of the interior circuits turned off the courtesy lights – but nothing else did. After several hours of electrical troubleshooting – also known as electrical frustration – I called it quits for the day before something bad happened.
Going back the next day I started with again studying the wiring diagrams. OK, let’s take a close look at this: the dome light, front door courtesy lights, and map light all come on when you open the doors, so they are all on the same circuit. So why can’t I find the dome light on the wiring diagram?
Background info: The dome light isn’t installed. The dome light housing, without a dome light lens, was in the trunk when I bought the car. And you can’t find the lens anywhere. I never installed the dome light – it is sitting in a box of parts somewhere. So I haven’t actually seen the dome light work.
Just a minute – there is the dome light, buried in tiny print in the corner of the wiring diagram. It isn’t part of the same circuit as the courtesy lights and map light. Huh. Well, that changes things. No wonder pulling the fuse had no effect! Bit in the butt by my assumptions yet again.
Pull the trim panel in the passenger footwell and study the wiring there. Everything looks OK…
Push in the door switch – and the lights go out. Odd… Close the door. And the lights get dimmer but stay on. Interesting! Play with the door. If you push on the door hard the lights go out. Open the door a fraction of an inch and the lights come back on. This is looking like the switch is right on the edge of on/off when the door is closed.
Get a thin piece of wood and tape it to the door where the switch touches as a shim. And now the courtesy light go on and off like they are supposed to.
This could explain all of the symptoms I’ve been seeing and fix the problem. But I’ve been here before. I’ll make a permanent shim since this is clearly a contributing factor. Hopefully this is the final fix – but I’m going to keep my eye on it.
The next project is replacing the door card on the front door. This will give me access to the inside of the door so I will double check all of the wiring while the door card is off.
With the increased power requirements I decided to add an additional 5V power injection cable. Moving on to the controller, the output on the controller can handle 600 pixels. No problem with the original 400 pixel tree, but the upgraded tree is 850 pixels (including 50 pixels for the star). Hmm, the controller has two outputs, so it should be able to handle 1600 pixels. A bit of quick testing showed that both outputs work so I should be good to go.
Between the new power supply, the new power injection cable, and the new controller cable the electronics box was getting a lot of changes. Fine, pull it completely apart, strip it down to bare baseplate, and start from scratch. I might as well go ahead and run everything through terminal blocks to make maintenance and any future upgrades easier.
Drag the tree from the front yard back into the shop, strip it down to component parts, and rebuild everything.
Hmm, I now need a mount for the star. The star mounts onto a piece of pipe – I know how to handle this! Measure the inside diameter of the pipe and make a bushing by turning down a piece of steel rod to fit. Drill and tap the rod. Cut the threaded part off of a bolt. Take the original topper apart and sandwich the topper disc between the two bushings. Slip the original bushing into the upright, slip the star on top, and the star is done.
Carefully rebuild the tree – electronics box, new base, new and old pixel strings, and new star. Plug everything in. Watch half of the tree light up…
Exactly as expected – the controller has to be programmed for the new pixels. Change the settings so that it now has an 800 pixel segment for the tree and a 50 pixel segment for the star. Select some effects and test it.
Success – the entire tree plus star lights up and the various effects programs work! But the tree is dimmer than it should be. Looks like I missed something with the power injection cables. Trouble shoot the power injection cables and everything looks good. OK, what else could it be???
Dig deeper into the controller. Interesting – there are three different settings in three different locations that impact brightness. Including some non-obvious ones that protect the system from using too much power without a good power injection system. Change these settings to fully use the available power. And Viola! there is brightness!
The next-to-last step was to program effects and timing for both the tree and the star. The last step was to drag the tree back into the front yard, hook everything up, and wait for nightfall.
At sunset the timer turned on all the outside lights. The new and improved Mega Tree sprang to life (sprang to light?) – and looked great!
The final result was worth the work. The light show is like something you would see on TV. And it is the only Mega Tree in the neighborhood. Actually, I’ve only been able to find one other Mega Tree in the entire town.
Unlike the Grinch, my heart didn’t grow three sizes. But maybe there is something to this Christmas spirit!
Introducing the Imperial Deathstar, a black 1963 Chrysler Imperial. This is one of the largest production sedans ever built, and arguably the best luxury car of its day.
Join me what will probably be a never-ending saga of grease, aching muscles, and an empty wallet as I work to restore this over 50 year old survivor to a reliable cruiser.