
In the last post we made a Gridfinity bin for a single ratchet. The most flexible approach is to make a separate bin for each ratchet. This takes full advantage of Gridfinity flexibility – you can add more ratchets just by making new bins and re-arranging the bins on the Gridfinity baseplate.
The downside of making a bin per ratchet is packing efficiency – in many cases you can fit more tools into a given space by putting multiple tools in a single larger bin. Basically you arrange the tools in a way that minimizes space and then put a bin around them. In many cases this can reduce the required space by more than 25% by using this approach.
The choice is long term modularity and flexibility vs. fitting more tools into given drawer space in a tool chest. Of course it isn’t an either/or decision – in some cases one approach makes sense, in other cases the other is the best choice. And in some cases it makes sense to just pile the tools in a drawer!
I decided on a divide and conquer approach: spend time packaging my most used tools into efficient Gridfinity bins, lesser used tools into generic Gridfinity bins, and pile miscellaneous tools into a drawer.
As part of this approach I also decided to do selective upgrades of certain tools. For example, I have a random pile of screwdrivers that have accumulated over the last 50 years. These range from good screwdrivers – mostly 1970’s Craftsman – to junk that should really be thrown away. I’ll cover the screwdriver strategy in a future article.
I have, ummm, “several” ratchets. And breaker bars. And accessories like extensions and adapters. Some of them are junk. Over the last five years or so I’ve built up a collection of good Tekton ratchets that are my go-to for anything involving a socket. I have nine of these – eight regular ratchets plus a ratchet with a 24 inch handle for heavy jobs. Plus a three foot 3/4″ breaker bar for really heavy jobs, like the ball joints on a 1963 Imperial. I won’t try to put the six foot pipe, AKA cheater bar, that enhances the three foot breaker bar into the tool chest.
Studying the situation I decided to put the two foot ratchet and three foot long cheater bar across the back of the drawer and not bother putting them into a bin.
The remaining 8 ratchets were a mixture of 1/4″, 3/8″, and 1/2″ drive and included regular handle, long handle, stubby handle, and flex handle. All of these are useful and needed for dealing with various fastener situations.
Grab these ratchets and start trying different arrangements. The goal is to fit them into a minimal space while being able to easily pick up any ratchet.
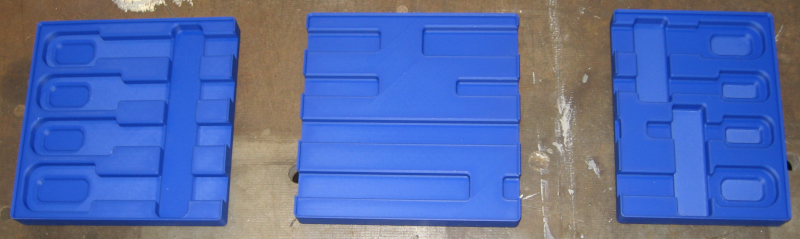
After playing with various arrangements it looks like I can fit them into an 11 x 4 grid unit bin. My 3D printer is capable of printing a 5 x 5 bin, so I used the Fusion Gridfinity Generator to generate two 4 x 4 and one 4 x 3 solid bins.
I positioned these bins together in Fusion and then started creating the outlinesfor each ratchet. Once I had the outlines I arranged them in the bin with equal spacing between each ratchet. These outlines were extruded and subtracted from the solid bins to create the cutouts. After making the solid cutouts for each ratchet I studied the result for a while and then created a set of finger reliefs to make it easy to pick up the ratchets.
As a last step I filleted (rounded) all the edges. On heavily loaded parts this is critical for strength and to avoid cracks. Sharp inside corners are the most common place for cracks to start. It isn’t really critical for these bins, but it is easy to in Fusion, looks better, and keeps my mechanical engineering spider sense from tingling so strongly.
With the three bins designed, send them to the printer one by one. Total time for this was over 12 hours, but 3D printing is “fire and forget”.
The three bins drop into the Gridfinity baseplate locking them into position. Add ratchets and done.
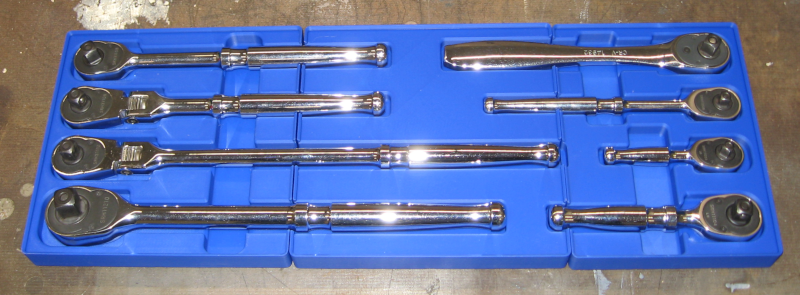
The ratchets fit. Once the bins are dropped into the baseplate they don’t move. This fixes the previous problem with the ratchets moving around when the drawer is opened and closed. You can easily grab whichever ratchet you need. And you can tell at a glance if you have returned all ratchets to their proper location.
Despite pounding my head against Fusion (I still have a lot to learn!) this was actually a fun little project. The results were exactly what I was shooting for: creating the CAD model and learning more, 3D printing, and fitting the end result into the tool chest.
On to the next project!